Topics List
ASP.NET,VB.NET,SQL Server,C#,Design
pattern,Sharepoint,WCF, WPF, WWF, Silverlight,Reporting Services,C#
training,Software testing
trick for search in my block
copy text which you want to search
link this
Data Reader Problem
ctr+F
and past the text and find
1-> step for configure to mysql to asp.net
2-> Select Record Using Mysql Database using asp.net
3-> Data Reader Problem
4->Insert into Mysql database using asp.net
5->ASP.NET login control with MySql
6->Basic C# Program
7-> Console Application
1-> sum of two number
2->Program relented to Array
3->Program Relented To Function
8-> How i can Connect to mysql database to Gridview and show data in gridview
*.) Visual Studio Create Setup Project to Deploy Web Application In IIs
Download the mysql connector from this link [click on that link]
mysqlconnector for asp.net
OR
mysql-connector-net-6.3.7-noinstall.zip
step for configure to mysql to asp.net
1-.>download and instal the setup
2->Write click on visual studio solution explorer and add reference
go to C:\Program Files\MySQL\Connector NET 6.3.7\Assemblies\v2.0
or C:\Program Files\MySQL\Connector NET 6.3.7\Assemblies\v4.0
2 Way add bin folder for write click on solution explorer and copy and past the dll into the folder from
C:\Program Files\MySQL\Connector NET 6.3.7\Assemblies\v2.0
C:\Program Files\MySQL\Connector NET 6.3.7\Assemblies\v4.0
Start with:
New WebSite
Asp.net Website
example
Select Record Using Mysql Database using asp.net
Imports System.Data
Imports MySql.Data.MySqlClient
public partial class page : System.Web.UI.Page
{
MySqlConnection con;
MySqlCommand cmd;
protected void Page_Load(object sender, EventArgs e)
{
try
{
con = new MySqlConnection("SERVER=localhost;UID=useruserID;PWD=userpasswrod;database=db_name");
con.Open();
string str = "select username,passowrd from batch_tab";
cmd = new MySqlCommand(str, con);
MySqlDataReader d40 = cmd.ExecuteReader();
Response.Write("str"+str);
while (d40.Read())
{
Response.Write("username" + d40.GetString(0)+"password"+d40.GetString(0)+"<br>");
} d40.Close();con.close();
}
catch (Exception exp)
{
}
finally
{ con.Close();
}
}
}
-------------------------------------------End--------------------------------------------------------
Note->
Some time if you getting the error
error->
ExecuteReader requires an open and available Connection. The connection's current state is closed.
Solution -> con = new MySqlConnection("SERVER=localhost;UID=useruserID;PWD=userpasswrod;database=db_name");
always write -> con.open();
after perform the selection insertion and deletion operation close the connection
con.close();
-------------------------------------------------------End-----------------------------------------------
Data Reader Problem->
Alwyas close the data reader
MySqlDataReader d40 = cmd.ExecuteReader();
d40 is datareader object
use d40.close();
------------------------------------------------------------End-------------------------------------------
Insert into Mysql database using asp.net
using System.Data;
//dll reference
using MySql.Data.MySqlClient;
//dll reference
public partial class _Default : System.Web.UI.Page
{
MySqlConnection con;
MySqlCommand cmd;
protected void Page_Load(object sender, EventArgs e)
{
try
{
con = new MySqlConnection("SERVER=localhost;UID=useruserID;PWD=userpasswrod;database=db_name");
con.Open();
//connection open
string ins_query = "insert into batch_tab(username,password) values(@username,@password)"; //insert query
cmd = new MySqlCommand(ins_query,con);
//first one is query and second is connection object
cmd.Parameters.AddWithValue("@username",txt_unm.Text); //txt_unm is textbox1
cmd.Parameters.AddWithValue("@username", txt_pass.Text); //txt_unm is textbox2
cmd.ExecuteNonQuery();
cmd.Dispose();
// relase all resources used by command
con.Close();//connection close
}
catch (Exception exp)
{
Response.Write(exp.Message);
}
finally
{
con.Close();
//finally if any one connection is open then close the connectrion
}
}
}
----------------------------------------------End----------------------------------------------------------
How i can Connect to mysql database to Gridview and show data in gridview
Create a ASP.NET 4.0 Web Site Project
Launch Visual Studio 2010. Click
File | New |Web Site... to open up the
New Web Site window as shown. Change the default name of the web site to something suitable. Herein it is named WebMySQL as shown.
Drag and drop a GridView Control
From Toolbox under Data find the GridView Control. Drag and drop this
control on to the Default.aspx page as shown. The GridView is 'unbound'
when it is dropped and has a few template columns and the smart tasks
menu. The menu item is shown in its drop-down state and displays the
menu items under 'Choose Data Source'.
Click on the <New Data Source...> item in
Choose data source. This will bring up the
Data Source Configuration wizard
as shown. Herein you need to choose a source of the data you are trying
to bring into the application to be bound to the GridView control.
You have several options here and for the present article we will be using data from a database. Click on the
Database icon as shown in the previous figure. With this you will be specifying an instance of SQLDataSource1 as your source of data. Click
OK.
This will take you to the next window shown here. Herein you will try
to establish a connection to the data source. In the combo-box shown
you may see some of the existing connections you have previously
established one of which may initially show up. Herein we will be making
a new connection. Click the
New Connection... button.
This brings up the
Add Connection window which gets displayed with the default data source, the Microsoft SQL Server Compact 3.5 as shown.
Connecting to MySQL
Before establishing
the connection make sure that your MySQL Server is running. If you have
not started you may do so as described in the article mentioned
earlier(the first article). You can start the server from the command
line as shown in the next figure.
Click the
Change... button to open the
Change Data Source window as shown in the next figure.
This window shows a number of Data Sources one of which is the MySQL
Database. Scroll down and highlight MySQL Database as shown and click
OK. This will bring you back to the
Add Connection window with form controls appropriate for making a connection to a MySQL Database.
The Server name; user name and Password are appropriate to the MySQL
Server on the local computer and you should enter those appropriate for
your installation. You may also test the connection as shown. Click
OK after the connection is successful. This adds the connection information to the
Configure Data Source wizard. You may expand the
connection string item to review the connection string created by your entries.
Click
Next. Here you have an option to save the connection
string to the Application Configuration File. This is a recommended
practice and hence shown checked.
Click
Next. Here you will be selecting the set of columns that you want to bring in to your application. It has already chosen the '
employees' table on the MySQL database
Testmove.
Choose several columns from the list of columns. The SELECT statement
is shown at the bottom of the above figure. If you were to click
Next
you would probably face a page which throws an exception. The square
braces [ ] shown for each of the columns is not acceptable to the
server. Click on the first option, "
Specify a custom SQL Statement or stored procedure" and then click
Next. This opens the "Define Custom Statements or Stored Procedures" page with a
Query Builder... button.
Here you can not only select columns but also other data modification
operations such as Update, Insert and Delete. For now we will be doing
just a selection.
The Query Builder displays the syntax errors in the previous statement.
Remove all the square brackets "[ ]" from the statement as shown.
This time you can run the query and verify the rows returned in the
Query Builder tool.
Click
OK to the Query Builder and click
Next. This brings you to the page where you can test the query and review the results as shown.
Click
Finish. You will be returned to the
Default.aspx
page. The GridView now has the column names you chose in configuring
SQLDataSource1. The smart tasks list has grown with some additional
tasks. From adding new columns to editing the template you can carry out
additional tasks.
The GridView's properties window can be used to set many of the formatting properties.
If you were to use the
Auto Format... link at the bottom of
the above window you can auto format to choose a scheme for the window.
Choosing a scheme on the left you can preview how it would appear when
rendered in the Preview area as shown.
After choosing the scheme build the project and browse to the Default.aspx page on your browser to display the page as shown.
In order to implement sorting of the data by column headers you need to choose the option
Enable Sorting at design time as shown.
You can also reorder column positions by highlighting the column you
wish to move around. This will add further tasks as shown here when the
'Postal Code' column is chosen. With the new tasks you can manipulate
the column or even remove it.
After you download and run the MySQL connector program you will find
the MySQL.Data in the References folder of Visual Studio as shown above.
Even the splash screen of Visual Studio shows MySQL as one of the
products with which it is integrated.
Source code
The source code of the Default.aspx page follows (the connection string is by choice stored in the
web.config file of the site):
<!DOCTYPE html PUBLIC "-//W3C//DTD XHTML 1.0 Transitional//EN"
"http://www.w3.org/TR/xhtml1/DTD/xhtml1-transitional.dtd">

<html xmlns="http://www.w3.org/1999/xhtml">
<head runat="server">
 <title></title>
</head>
<body>
 <form id="form1" runat="server">
 <div>

 </div>
 <asp:GridView ID="GridView1" runat="server" AllowSorting="True"
 AutoGenerateColumns="False" BackColor="White" BorderColor="#3366CC"
 BorderStyle="None" BorderWidth="1px" CellPadding="4"
 DataSourceID="SqlDataSource1">
 <RowStyle BackColor="White" ForeColor="#003399" />
 <Columns>
 <asp:BoundField DataField="EmployeeID" HeaderText="EmployeeID"
 SortExpression="EmployeeID" />
 <asp:BoundField DataField="LastName" HeaderText="LastName"
 SortExpression="LastName" />
 <asp:BoundField DataField="FirstName" HeaderText="FirstName"
 SortExpression="FirstName" />
 <asp:BoundField DataField="City" HeaderText="City" SortExpression="City" />
 <asp:BoundField DataField="Region" HeaderText="Region"
 SortExpression="Region" />
 <asp:BoundField DataField="PostalCode" HeaderText="PostalCode"
 SortExpression="PostalCode" />
 </Columns>
 <FooterStyle BackColor="#99CCCC" ForeColor="#003399" />
 <PagerStyle BackColor="#99CCCC" ForeColor="#003399" HorizontalAlign="Left" />
 <SelectedRowStyle BackColor="#009999" Font-Bold="True" ForeColor="#CCFF99" />
 <HeaderStyle BackColor="#003399" Font-Bold="True" ForeColor="#CCCCFF" />
 </asp:GridView>
 <asp:SqlDataSource ID="SqlDataSource1" runat="server"
 ConnectionString="<%$ ConnectionStrings:testmoveConnectionString %>"
 ProviderName="<%$ ConnectionStrings:testmoveConnectionString.ProviderName %>"
 SelectCommand="SELECT EmployeeID, LastName, FirstName, City, Region,
 PostalCode FROM employees"
 >
 </asp:SqlDataSource>

 </form>
</body>
</html>
------------------------------------------- End------------------------------------------------------------
ASP.NET login control with MySql
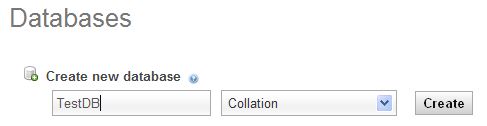
STEP 1:
Open the MySQL Admin page and create a new database:
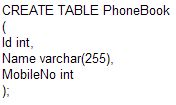
STEP 2:
After creating a new database, create a new table:
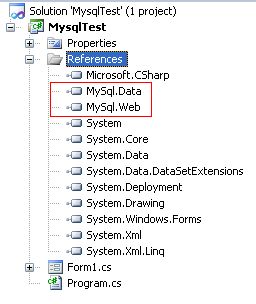
STEP 3:
After
creating the new table, open Visual Studio and click on the new project
and give the project a name; it will open the new project, then click
on the solution explorer (F4); right-click on "Reference" to add a new
reference into the project. Add a reference for those two .dll files to
the project (MySql.dll (Win apps), MySql.web.dll (Web apps)).
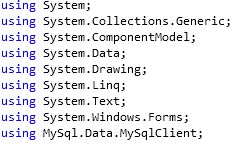
STEP 4:
Add the namespace to the project:
STEP 5:
Create a MySQL connection string:

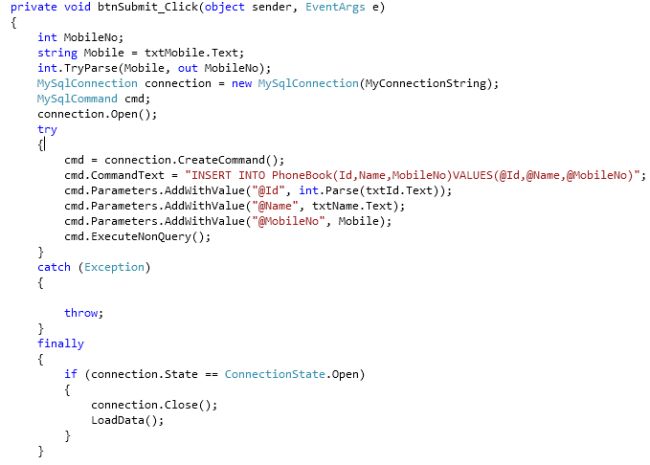
STEP 6:
The following code will insert the data into the MySQL table:
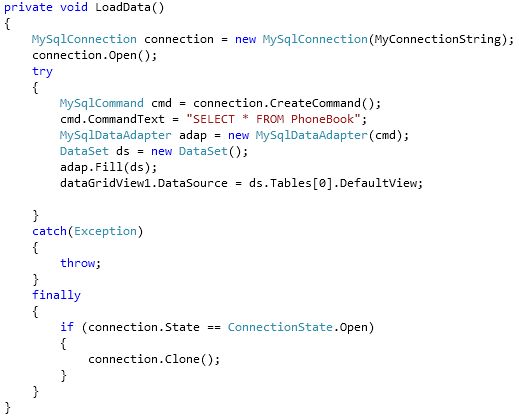
STEP 7:
The following function will load the data from the table and bind it into the grid view:
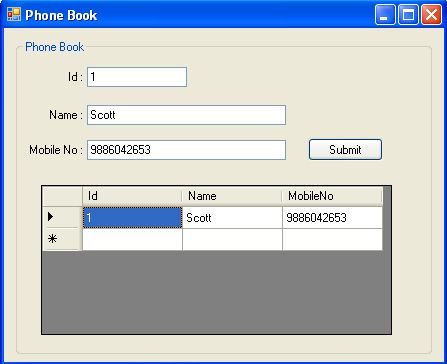
STEP 8:
The final result is as shown in the following form:
------------------End----------------------------------------
Visual Studio Create Setup Project to Deploy Web Application In IIs
If
we want to deploy application in IIS we need prepare separate published
files folder and create virtual path in IIS, point to our folder and
need to change some properties to make it work through our IIS by doing
all these things we will waste a lot of time.
Instead
of doing all these things if we prepare one setup file and make it
everything for us like prepare published folder, create virtual
directory, set properties and create website in IIS just by simple
install how is it? Nice right.
It
is very useful for us many situations like suppose if we do one
application for client we need to deploy that application in client
machine instead of giving all the files and instructions to deploy it in
his machine we just give one simple setup file and once he run that
will deployed all files in IIS and site will create automatically with
all properties in system.
To create Setup file for our application follow below steps.
Step1: First Open visual studio ---> Create new Project (File ---> New ---> Project)
After that open Default.aspx page and write some code like this
<html xmlns="http://www.w3.org/1999/xhtml">
<head runat="server">
<title>Sample Page to Create Setup Files</title>
</head>
<body>
<form id="form1" runat="server">
<div>
<table width="50%">
<tr>
<td>
<p>
<img alt="Aspdotnet-Suresh" src="https://lh5.googleusercontent.com/_B28NJpJ61hA/TdgnS7lh7mI/AAAAAAAAAi4/oLTicIRgEIw/FinalLogo.png">
</p>
<p>
Aspdotnet-Chitranjan
offers Asp.net,C#.net,SQL Server,Web Services,WCF,WPF,MVC,Crystal
Reports,AJAX,XML,JavaScript,JQuery,Gridview articles, samples and
tutorials,code examples of asp.net 2.0,3.0,3.5,4.0 and Articles,examples
of .net technologies
</p>
</td>
</tr>
</table>
</div>
</form>
</body>
</html>
------------------------------------------------------------------
Basic C# Program
Console Application-> A console application is an application that runs in a console window same as a C and C++ program.
It doesn’t have any graphical user interface. Console Applications will have character based interface.
To work with console applications in .NET you have to use a class called Console that is available within the namespace System, which is the root namespace.
Console Application in C#
To read a line of text from the console window, you use the Console.ReadLine() method.
This will read an input stream from the console window and return the input string when user presses the Enter Key.
There are also two methods for writing to the console, which are used extensively
- Console.Write() — Writes the specified value to the console window.
- Console.WriteLine() — This does the same, but adds a newline character at the end of the output.
Example:
The below C#.NET code lets the user input a line of text and displays that text
string s = Console.ReadLine();
Console.WriteLine(s);
To write C# console program ,
Open Visual Studio ->File -> New Project ->Visual C#-> select Console Applications
Sum of two Number
using System;
namespace ProgramCall
{
class Program
{
static void Main(string[] args)
{
int A, B, SUM;
Console.WriteLine("Enter Two Integers");
A = int.Parse(Console.ReadLine());
B = int.Parse(Console.ReadLine());
SUM = A + B;
Console.WriteLine("Sum Of {0} And {1} Is {2}", A, B, SUM);
Console.Read();// To prevent console from vanishing
}
}
}
OUTPUT
----------
Enter Two Integers
12
45
Sum Of 12 And 45 Is 57
All the program run on the notpad of use
.cs extension .
[Console Program]
Program relented to Array
1)
using System; // using system namespace
class Demo
{
static void Main()
{
// int[] a;
// a = new int[5];
/*int[] a = new int[5];
a[0] = 45;
a[2] = 26;
a[3] = 84;*/
/*int[] a;
a = new int[] { 34, 12, 76, 12, 85 };*/
int[] a = { 45, 76, 38, 54, 45, 21 }; //static declaration of array element
for (int i = 0; i < a.Length; i++)
Console.WriteLine(a[i].ToString()); //show or print the element of the array
}
}
2)
using System;
class Demo
{
static void Main()
{
int[] a = new int[5];
for (int i = 0; i < a.Length; i++)
a[i] = int.Parse(Console.ReadLine());
Console.WriteLine();
for (int i = 0; i < a.Length; i++)
Console.WriteLine(a[i]);
}
}
3)
using System;
class Demo
{
static void Main()
{
int[,] a = new int[2, 3];
a[0, 0] = 4;
a[1, 0] = 3;
a[1, 2] = 9;
for (int i = 0; i < 2; i++)
{
for (int j = 0; j < 3; j++)
Console.Write(" " + a[i, j]);
Console.WriteLine();
}
}
}
4)
using System;
class Demo
{
static void Main()
{
/*int[][] a = new int[2][];
a[0] = new int[3];
a[1] = new int[4];
a[0][0] = 4;
a[1][0] = 3;
a[1][2] = 9;*/
int[][] a = new int[3][];
a[0] = new int[] { 3, 6, 8 };
a[1] = new int[] { 5 };
a[2] = new int[] { 7, 5, 2, 1 };
for (int i = 0; i < a.Length ; i++)
{
for (int j = 0; j < a[i].Length; j++)
Console.Write(" " + a[i][j]);
Console.WriteLine();
}
}
}
-----------------------------------------------End----------------------------------------------------------
----------------------------------------------End Array Program------------------------------------------
Program Relented To Function
Program Find the Prime Number using function
using System;
class Student
{
int rno;
string nm;
public void SetData(int r, string n)
{
rno = r; nm = n;
}
public void GetData()
{
Console.Write("Enter Rno ");
rno = int.Parse(Console.ReadLine());
Console.Write("Enter Nm ");
nm = Console.ReadLine();
}
public void ShowData()
{
Console.WriteLine(rno + " " + nm);
}
}
class Demo
{
static void Main()
{
Student s = new Student();
s.GetData();
Student t = new Student();
t.SetData(2, "Deepak");
s.ShowData();
t.ShowData();
}
}
2)
using System;
class Student
{
int rno;
string nm;
public void SetData(int r, string n)
{
rno = r; nm = n;
}
public void GetData()
{
Console.Write("Enter Rno ");
rno = int.Parse(Console.ReadLine());
Console.Write("Enter Nm ");
nm = Console.ReadLine();
}
public void ShowData()
{
Console.WriteLine(rno + " " + nm);
}
}
class Demo
{
static void Main()
{
Student s = new Student();
s.GetData();
Student t = new Student();
t.SetData(2, "Deepak");
s.ShowData();
t.ShowData();
}
}
3)
using System;
class Student
{
int rno;
string nm;
public void SetData(int r, string n)
{
rno = r; nm = n;
}
public void GetData()
{
Console.Write("Enter Rno ");
rno = int.Parse(Console.ReadLine());
Console.Write("Enter Nm ");
nm = Console.ReadLine();
}
public void ShowData()
{
Console.WriteLine(rno + " " + nm);
}
}
class Demo
{
static void Main()
{
Student s = new Student();
s.SetData(1, "Ashish");
s.ShowData();
Student t = s;
t.ShowData();
t.SetData(2, "Deepak");
t.ShowData();
s.ShowData();
}
}
4) Program related to function show the employee details
using System;
class Emp
{
int eno;
string enm;
double esal;
public Emp() { }
public Emp(int eno, string enm, double esal)
{
this.eno = eno; this.enm = enm; this.esal = esal;
}
public void SetData(int eno, string enm, double esal)
{
this.eno = eno; this.enm = enm; this.esal = esal;
}
public void GetData()
{
Console.Write("Enter Emp No. ");
eno = int.Parse(Console.ReadLine());
Console.Write("Enter Emp Name ");
enm = Console.ReadLine();
Console.Write("Enter Emp Salary ");
esal = double.Parse(Console.ReadLine());
}
public void ShowData()
{
Console.WriteLine(eno + " " + enm + " " + esal);
}
}
class Demo
{
static void Main()
{
Emp e1 = new Emp(1,"Raj",5000);
Emp e2 = new Emp();
e2.GetData();
e1.ShowData();
e2.ShowData();
}
}


